Mechanical Keyboard Guide
Are you sitting there typing on your computer wondering what makes Das Keyboards such high-quality keyboards? Maybe you think mechanical keyboards are only 80’s IBM keyboards. Either way, a little education about the differences in keyboards will explain why so many people are making the move to mechanical keyboards. In order to fully understand the technical differences between keyboards, you will first need to understand some of the terminology first. Read on to learn about the differences. At the end of the first section is a helpful glossary of common keyboard terms in case you are unfamiliar with any keyboard terms and definitions.
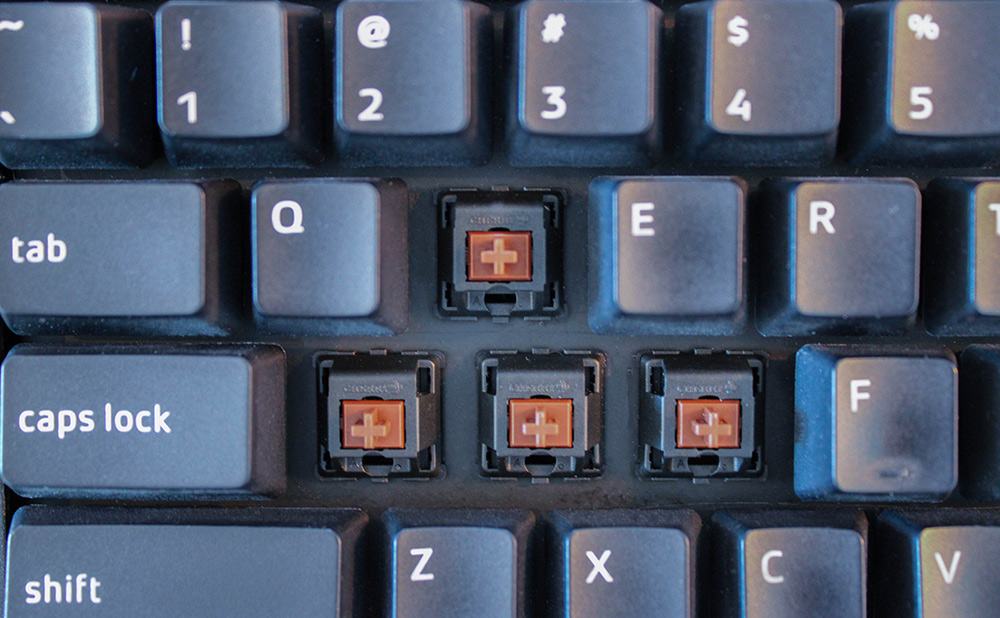
Table of contents
- Part 1: Membrane vs. Mechanical Keyboard Comparison
- Part 2: Common Keyboard Terminology
- Part 3: Keycap Shapes
- Part 4: Key Printing
- Part 5: Common Key Switches
- Part 6: Mechanical Keyboard Maintenance and Cleaning
Membrane vs. Mechanical Keyboards
Most inexpensive keyboards, like the ones that come with computers, utilize a flexible membrane layer beneath the keys. When you press a key, it causes the membrane to press down and make contact with a bottom layer. This allows current to flow “closing” the switch so that the parent device registers the keypress. The biggest problem with this type of keyboard is that you have to completely depress the key, also known as “bottoming out.” There is also little to no tactile feedback. Without tactile feedback it is very difficult to type without bottoming out every keystroke, causing over-exertion and finger/hand fatigue that can lead to carpal tunnel syndrome. Mechanical keyboards, however, use a switch underneath every key. Depending on the type of switch, they have a variety of response and travel times. Key switches will be explained in full detail in future installments, but the differences amongst them include the tactile feel and audible click each produces. Switches on a mechanical keyboard are made to last up to 50 million keystrokes. Think about how often you press a single key, and you’ll realize that’s a long time! Compare that to membrane switches, which typically last around 5-10 million keystrokes, and you’ll see why the initial investment in a mechanical keyboard is well worth it. A mechanical keyboard is the only keyboard with the capability to register all keys at one time (PS/2 permitting), also known as full N-Key Rollover. This is helpful for folks who type really fast and need to be able to hit keys in quick succession. Gamers who need to mash key combos quickly to frag their enemy also benefit. Try it on a membrane keyboard and you may be the one fragged. Certainly, the clicking sound on a mechanical keyboard can be an acquired taste, but what is interesting is how many people find it relaxing. You get the rhythm of clicking while you type and often it is a calming sound. Some people find that listening to the clicks helps them create a faster typing speed. Plus, not having to bottom out with each key allows you to move to the next letter more quickly with less energy wasted. Try it for yourself and see if it doesn’t make a difference in how quickly you type.
Keyboard Terminology
Common Keyboard Terms
Actuation Point is the point at which the contact mechanism registers a keypress. Key Blocking is when multiple keys are depressed simultaneously, your keyboard will not recognize future keystrokes until the original keys are lifted. Keyboards have a maximum number of keys it can register at one time and if you depress more than its limit, it won’t register the other key presses. Key Ghosting can occur when three keys are pressed at once and a fourth keystroke you did not press is registered by your computer. Key Rollover is the number of keys that can be pressed in succession without having to lift a finger from any of the previous keys. Keyboards use the term KRO to represent the maximum number of keys you can press without experiencing any key blocking. So a 3KRO keyboard is a keyboard that can register 3 keys being pressed at once without experiencing key blocking. NKRO refers to N-Key Rollover, the ultimate in keyboards. A keyboard with N-Key Rollover can register as many keys as you can press at once without any key blocking issues. Currently, this feature is only available in keyboards with PS/2 connectors. PS/2 is a 6-pin Mini-DIN connector used for connecting some keyboards and mice to a PC compatible computer system. While most modern connectors are USB, PS/2 has the benefit of full N-Key Rollover. Reset Point is the point when the mechanism ceases to register the keypress. Tactile Point is the point during the keypress at which the bump occurs to indicate to your finger that the key has been actuated. USB, or Universal Serial Bus, is the current industry standard for the connection of computer peripherals to personal computers.
Most Common Keyboard Types
Buckling Spring Keyboards use a buckling spring mechanism that controls a small hammer. When you strike the key, the mechanism causes the hammer to strike a capacitive or membrane switch. The spring is responsible for the tactile and audio response of the keyboard. These were utilized in the legendary IBM Model M keyboards. Dome Switch Keyboards are a hybrid of membrane and mechanical keyboards. They utilize either metal “dome” switches or polyester formed domes that collapse when a key is pressed. The collapsed dome then connects the two circuit traces and completes the connection to enter the character. Both versions are very common in consumer keyboards. Mechanical Keyboards utilize a switch underneath each key. Depending on the type of switch, these keyboards can have a variety of response and travel times, which make them attractive to gamers and heavy typists. Membrane Keyboards have one-piece plastic keytop/switch plungers that press down on a membrane to actuate a contact in an electrical switch matrix. They are the most inexpensive to manufacture and the most common type of keyboard available, but they wear out more quickly than other types of keyboards. Scissor-switch Keyboards use a type of dome-switch. The keyboard still uses rubber domes, but a special plastic, scissors-like mechanism links the keycap to a plunger that depresses the rubber dome with a much shorter travel than the typical rubber dome keyboard. These can often be found in built-in keyboards on laptops and low-profile keyboards. Topre Keyboards are a type of hybrid between a mechanical switch and a rubber dome switch keyboard. The Topre mechanism uses a spring underneath a rubber dome. Because of the domes, they are much quieter than most mechanical keyboards.
Key Shapes
Keys have come a long way from the flat disks on vintage typewriters. The shape of the keys and the feel under your fingertips have been taken more seriously over the years by keyboard manufacturers, although, choosing from the different types is purely based on personal preference.
Cylindrical keys
The type of key on a Das Keyboard, and what you typically find on most keyboards. These keys curve up on the left and right edges in order to cradle your fingertips.

Flat keys or Chiclet Keyboards
Typically found in laptops, and just as the name implies they are flat on top with no curvature. They are often referred to as “Chiclet” keys, because they look like the Chiclet chewing gum which are small squares with rounded corners.

Spherical keys
Keys that are curved on all four edges (see from the photo to the left). A spherical well is in the center of each key. These keys are typically found on old model typewriters like the IBM Selectric and some vintage keyboards.

Key Printing
There are a variety of printing types from pad printing to dye sublimation printing. If you are not familiar with these terms, it can be quite confusing as to whether you need a keyboard with pad printing or if it’s worth spending the money for double-shot injection molded keys.
Pad Printing (or Screen Printing)
The least expensive, most common form of key printing is Pad Printing, where the key image is printed using a durable ink. Often, the manufacturer will follow up with a clear coat to extend the life of the image. Unfortunately, this type of printing tends to wear out fast for most heavy typists. Check out the video to see how the production process works.

Laser Etching
A laser is used to burn the required character into the keycap, physically marking it, therefore impossible to wear off. This works best on light colored keys as it results in an image with a black burned color, but it works for black keys as well. Many manufacturers, Das Keyboard included, fill the engraved area with colored filler in order to laser etch on a black plastic background and have the character standout. You can also feel the texture of the raised character on each key with this process.

Dye Sublimation Printing
Dye Sublimation is a process where heat is used to impregnate a material with a dye, resulting in the dye sinking into the plastic. The nice feature to this is due to the dye becoming part of the plastic, it cannot be worn off like in pad printing. This is a much more expensive method of printing keys and must be used in situations where the dye is darker than the material being dyed.


Double Shot Injection Molding
Instead of printing characters onto plastic, double shot injection molding molds the character and underside of the keycap into one piece of plastic with the top part of the keycap molded onto another piece. They are fused together to form a dual-layer keycap with a very high contrast graphic. This is the most expensive, highest quality type of printing possible and results in a key that cannot be worn off as it is part of the keycap. It also limits the printing to two colors per keycap due to the molds and expenses involved. There have been examples of more than two colors using this method, but the price at this point is way too high for most companies to embrace. In fact, even most keyboard companies have abandoned double-shot injection molding based upon its high cost.
Common Mechanical Keyboard Switches
There are many different types of switches found in mechanical keyboards. Due to mechanical keyboards’ durability, it is common to find functioning used keyboards with switches that are no longer manufactured. The only way to know what type of switch is inside the keyboard is to take apart a board and sometimes even the switches, risking the destruction of the keyboard or the switches. Switches differ in how they close the circuit, signaling a key depression, the amount of tactile bump felt and the loudness of the click when the key is depressed.


Cherry MX Switches
Cherry MX are mechanical switches that consist of a spring and two metal contacts. When depressed, it causes the plastic stem to go down, at which point a steel spring inside closes the switch, signaling the key has been depressed. One of the benefits of Cherry MX switches is the gold-plated contacts. Unlike other metals, the gold prevents the contacts from rusting, increasing the lifespan of the switch. There are a variety of switch constructions for these types of keys, and they can be differentiated by the color of the stem, which you can see when you remove the keycap.
Linear Switch: Cherry MX Black
Cherry MX Black switches were one of the first mechanical keyboard switches available to the general public. They are linear, or non-tactile, this means that Black switches don’t have a loud click or a bump that is felt when a key is depressed. Many gamers like these because of the smooth feel and the fact that the actuation and release points are at the exact same position, making double-tapping easier than other switches.

Actuation Force: 60cN
Many gamers like these because of the smooth feel and the fact that the actuation and release points are at the exact same position, making double-tapping easier than other switches.
Light Tactile Switch: Cherry MX Brown
The Brown switches are about halfway between a typing and a gaming switch. Unlike the black switches, the browns have a soft, tactile bump about halfway through the keypress. Some people prefer them for gaming since it enables you to double tap faster and typists like them because they still have good tactile feedback, but the audio feedback isn’t quite as noticeable as Blue switch. The Brown switches have a softer click when depressed and require less force to actuate. The Das Keyboard tactile-soft series utilizes Brown switches.

Actuation Force: 55cN

Clicky Switch: Cherry MX Blue
The Blue switches are popular within the typing community because of the “clicky” tactile bump when the activation point is hit. The overall experience of Blue switches is very similar to typewriters, however, those around you might not be as big of a fan due to the audio feedback. The standard “clicky” versions of Das Keyboards utilize Blue switches.

Actuation Force: 60cN
Light Tactile Switch: Cherry MX Clear
Cherry MX Clear switches are a bit harder to find in keyboards, but many users consider them to have more of a tactile feel than the Browns without being as clicky as the Blue switches. The clear switches have a higher actuation force than the Brown switches and a more pronounced tactile bump. Also, Clears tend to have the most friction among mechanical key switches, this is due to the size of the tactile bump.

Actuation Force: 65cN
Linear Switch: Cherry MX Red
Cherry MX Red switches are similar to the Cherry MX Blacks in that they are both categorized as linear, non-tactile. This means that their feel remains constant through each up-down keystroke. Where they differ from the Black switches is in their resistance; Red switches require less force to actuate. The result is a feeling that most perceive as “smoother” and “faster,” making them especially popular among gaming enthusiasts.

Actuation Force: 45cN
Other Mechanical Switches
Buckling Spring
Buckling Spring switches contain a spring that buckles when the key is pushed. This mechanism controls a small hammer that strikes a membrane switch to signal the key has been depressed.

Topre Switches
Topre switches are a newer development that are almost a hybrid between a mechanical switch keyboard and a rubber dome keyboard. Topre switches are capacitive switches that use a spring underneath a rubber dome. When you depress a key, it depresses the spring, causing a capacitive circuit underneath to sense that the key has been depressed.

Alps Switches
There are a few commonly available types of ALPS switches. The most commonly discussed type is nicknamed the “Bigfoot” because the original ALPS keyboards had a big footprint, taking up a large amount of desk space. Of the Bigfoot switches, there are two versions: complicated and simplified. Complicated ALPS come in a variety of colors with slight differences between them. You can find tactile and clicky, tactile and non-clicky, and linear versions of Complicated ALPS. Simplified ALPS switches are considered by many to be less smooth and louder than the Complicated ALPS. These are most often found in newer keyboards because the Complicated ALPS are no longer available. There are not only a variety of versions within each type of ALPS switch, but there are also many ALPS clones out there that all have a different feel while looking very similar to the real thing. Due to this, determining which type of ALPS you have, or if it’s a real ALPS, requires opening the switch, a difficult task that takes a gentle hand as just removing them could potentially damage the switches.

Mechanical Keyboard Maintenance and Cleaning
Whether it’s from sweaty hands typing, or crumbs falling while eating lunch at the computer, keyboards get dirty. After spending time researching mechanical keyboards and then purchasing one for its superior performance and longevity, it’s now time to consider cleaning and maintaining it. Whether you just want to clean the surface or pull the keys and clean every inch of your keyboard, it’s important to know the best way. Here are some tips on keeping your keyboard clean and also how to remove the keycaps for cleaning or replacement.
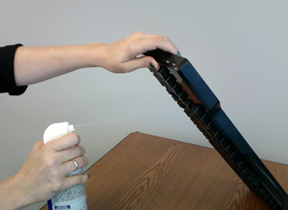
Simple mechanical keyboard maintenance cleaning
To maintain a mechanical keyboard and keep it clear of debris, turn the keyboard upside-down and shake it to let any loose debris inside fall out. Take some canned air and lightly spray the keyboard to remove anything that didn’t come out initially. It helps if you hold the keyboard upside-down at an angle so the crumbs and debris fall out. Also use quick, short blasts when spraying the canned air.
Thorough cleaning
1) To do a more thorough cleaning of the keyboard, the small keycaps from the keyboard need to be removed first. If you have never removed the keycaps from a keyboard, check out our how-to video on replacing keys first. It demonstrates how to remove the keys and how to put them back on a mechanical keyboard. Use a key puller to help pull off the keycaps. Remember that the keys have different shapes based upon placement in the keyboard and, in the case of the Das Keyboard Ultimate, it can be very hard to differentiate the keys. We recommend organizing the keycaps as they are removed to help easily put them back after cleaning the keyboard. We strongly discourage anyone from attempting to remove the space bar, return key, and other large-sized keys. These keys have a support bar underneath them that can make it very tricky to remove the key and even more difficult to put it back in place. As shown in the photo below, the stabilizer bar connects to 2 little white pieces attached to the keycap. It is very easy to break these pieces or even lose one if it flies off the keycap when removed. Unfortunately, there are no replacement parts available for these, so once broken or lost, the keys they attach to will no longer function properly. Since it is possible to get a very thorough cleaning without removing these keys, it’s recommended to leave them in place.
2) Once the keys are removed, hold the keyboard upside-down and shake it to let the loose debris drop out of the keyboard. Then, take a can of air and a brush to help loosen and remove any remaining bits inside.
3) If something has spilled into the keyboard, take a damp cotton cloth or microfiber and wipe the area with it. If needed, use a drop of isopropyl alcohol or diluted liquid soap (1 drop to a gallon of water) to help remove any sticky substances. Do not apply the liquid directly to the keyboard, apply it onto the cloth. The switches in Das Keyboards use gold contacts because the gold prevents the contacts from rusting; however, if there is any liquid in the switch around the contact, it will keep the connection closed (as it is when a key is depressed), until the water evaporates. Always check with the manufacturer of your keyboard because some keyboards (excluding the Das Keyboard) do not do well with alcohol and might be damaged by it. If this is not enough to clean the spill, check out our blog post on cleaning beverage spills. It’s very risky to soak your keyboard in isopropyl alcohol, but if nothing else is working, it may be worth it to save the keyboard.
4) Place the keycaps back on the keyboard and then take a very slightly damp cotton cloth or microfiber and wipe the top of the keys and the enclosure with it. If the keys are seriously dirty to the point that the inscriptions look faded, use a tiny amount of isopropyl alcohol or diluted liquid soap as described in step 3.
5) Turn the keyboard upside-down and let it dry overnight. This can take even longer, depending on the climate and room temperature. No matter what, make certain the keyboard is completely dry before plugging it in and using it. While there are some articles reporting success in washing a keyboard in the dishwasher, putting an electronic device into a dishwasher where it will be drenched in water is a huge risk. The only way to do this is to completely take the keyboard apart, which usually voids the warranty. Hard water or water from a water softener can cause corrosion inside the keyboard because of the salts and minerals. Using tiny amounts of alcohol or diluted liquid soap to clean the keyboard is a much better method than attempting to stick it into a dishwasher.
Photo Credits:
Pictures of Keycaps and Cherry MX switch thanks to Ripster on OCN & Geekhack Key cutaways thanks to Signature Plastics Special thanks to Lethal Squirrel from Geekhack.org for the animated Cherry MX images.
Comments
Post a Comment